Why the Final Inspection Home Building Step Is Your Last Line of Defense Before Closing
The final inspection in home building is the single most important quality checkpoint before you take ownership of your new home. Once you close, anything left unaddressed becomes your responsibility — not the builder’s.
Here’s what you need to know at a glance:
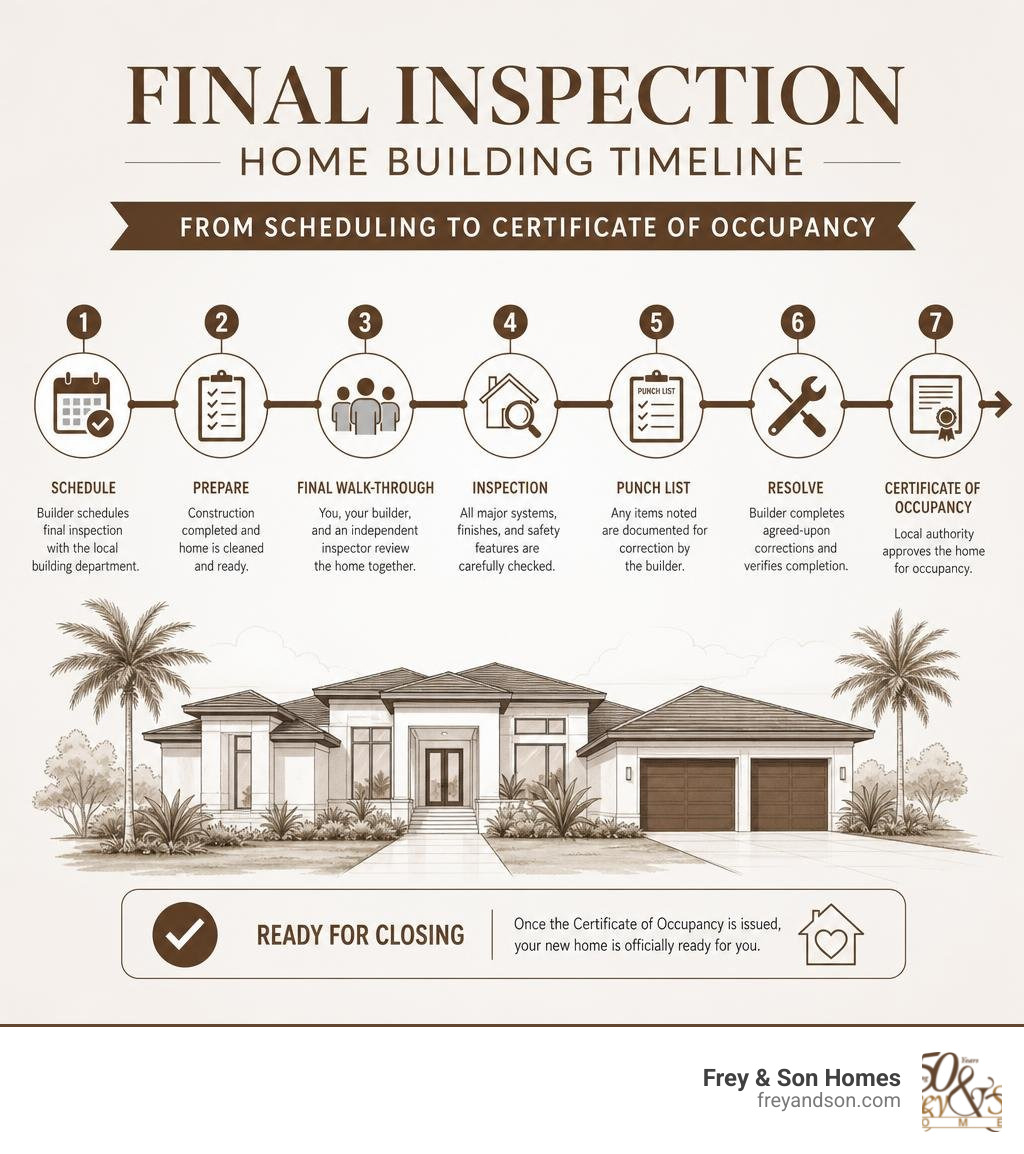
- What it is — A final inspection verifies that your home meets local building codes, all systems are functional, and the finished product matches your contract.
- When it happens — Typically one to three days before closing, after construction is complete and the home has been cleaned.
- Who attends — The builder’s representative, you (the buyer), and ideally an independent third-party inspector.
- What gets checked — Exterior, roof, structural elements, electrical, plumbing, HVAC, appliances, interior finishes, and safety devices.
- Why it matters — More than half of new-build homeowners discover defects after moving in. A $300–$500 independent inspection can prevent tens of thousands in future repair costs.
- What happens next — Issues go on a punch list. Minor items may be resolved post-closing; safety or habitability issues should be fixed before you sign.
Most buyers focus on design selections, floor plans, and closing dates. The final walk-through gets treated as a formality. It isn’t.
Even on well-run projects, the handoff between multiple trades — framers, electricians, plumbers, finish carpenters — creates opportunities for things to slip through. Municipal inspectors check for minimum code compliance, but they don’t work for you, and they don’t verify that your home was built exactly to your contract.
That gap is exactly what the final inspection is designed to close.
I’m Micheal Ouellette, Vice President of Sales and Business Development at Frey & Son Homes, and with more than 27 years of experience guiding clients through the final inspection home building process in Southwest Florida’s luxury custom market, I’ve seen how a structured, well-prepared walk-through protects buyers and sets the tone for a confident move-in. In this guide, I’ll walk you through everything — from scheduling and checklists to post-closing adjustments and warranty inspections — so you know exactly what to expect and how to protect your investment.
The Role of Final Inspection Home Building Processes
In the grand scheme of the 6 Major Phases of the Home Building Process, the final inspection acts as the ultimate gatekeeper. It is important to distinguish between the municipal final building inspections and your personal pre-handover walkthrough.
Municipal building inspectors represent the local authority having jurisdiction. Their job is to ensure the home meets the bare minimum standards of the International Residential Code (IRC) and Florida Building Code. Passing these municipal checks is what triggers the issuance of the Certificate of Occupancy (CO), which legally permits you to live in the home.
However, local code compliance does not guarantee cosmetic perfection, contract alignment, or high-end craftsmanship. To understand how final inspections work on a contractual level, you must realize that your private final inspection is where you verify that every custom finish, luxury material, and functional detail matches your expectations.
Additionally, modern Florida energy codes require strict third-party testing before a home can pass its final municipal review. These include:
- Duct Leakage Testing: Performed by an independent tester to ensure duct leakage is minimal (typically ≤4 cfm25 per 100 square feet of conditioned floor area).
- Blower Door Testing: Measures the airtightness of the building envelope, with typical Florida targets ranging between 3 to 5 air changes per hour (ACH50).
While municipal and third-party inspectors focus on technical metrics, your private inspection ensures the home is complete, beautifully finished, and ready for your family.
Scheduling, Attendees, and the Walk-Through Process
Timing is everything. Your private final inspection should be scheduled after the “builder’s clean” (the first deep clean of the house) but at least a few days before your official closing date. This buffer gives the building team time to address minor touch-ups before you sign the final paperwork.
The walk-through is a collaborative effort. Typically, the following people should attend:
- The Builder’s Representative: Usually your construction superintendent or project manager, who will document your feedback.
- The Buyers: You and your co-buyers, armed with your contract and selection sheets.
- An Independent Third-Party Inspector: A licensed professional hired by you to provide an unbiased, highly technical assessment.
Depending on whether your home is in Naples, Cape Coral, Marco Island, or Fort Myers, local municipal rules and scheduling timelines will vary. For instance, coordinating with local entities like Lee County Inspection Services ensures that all prerequisite permit files are closed out before your walk-through.
To help you understand the distinct roles during closeout, here is a comparison of the two main types of evaluations:
| Feature | Builder-Led Walk-Through | Independent Third-Party Inspection |
|---|---|---|
| Primary Focus | Home orientation, cosmetic punch list, and contract selections. | Structural integrity, safety, code compliance, and system functionality. |
| Who Conducts It | Builder’s Superintendent & Buyer. | Licensed, InterNACHI-certified Home Inspector. |
| Report Format | Builder’s punch list / sign-off sheet. | Detailed written report with photos and thermal imaging. |
| Financial Interest | Focused on completing the contract and closing. | Unbiased; works solely for the buyer. |
| Cost | Included in your home contract. | Typically $300 to $600. |
Builder-Led Walk-Through vs. Independent Inspections
While we pride ourselves on our internal Quality Assurance protocols, we always welcome independent third-party inspectors. A builder-led walk-through is primarily an orientation. It is designed to teach you how to operate your smart home systems, locate your main water shut-off valves, and identify cosmetic blemishes like paint drips or drywall scuffs.
An independent inspection, costing between $300 to $600, goes much deeper. An independent inspector will climb onto the roof, run every faucet simultaneously to test water pressure, check the attic’s insulation depth, and use thermal imaging to scan for hidden moisture or electrical hotspots. Investing in a third-party inspector provides peace of mind, ensuring that hidden issues are corrected while the builder is still contractually obligated to fix them.
The Ultimate Final Inspection Home Building Checklist
When you step into your new home for the final walkthrough, you need a systematic plan. Do not just wander from room to room admiring the view. Start from the outside and work your way in, evaluating every system systematically.

To ensure your luxury finishes match what you selected in your Ultimate Guide to Home Selections, use this comprehensive checklist:
1. Exterior and Site
- Grading and Drainage: Ensure the ground slopes away from the foundation to prevent water pooling during heavy Florida rainstorms.
- Roof and Gutters: Check for cracked or missing tiles, secure flashing, and properly sloped gutters.
- Siding and Paint: Inspect for uniform stucco application, paint coverage, and thorough caulking around windows and doors.
- Landscaping and Irrigation: Test the sprinkler zones and check that sod and plantings meet the contract agreement.
2. Interior Finishes
- Drywall and Paint: Look along the walls under natural light to catch drywall imperfections, sanding marks, or thin paint.
- Flooring: Check for cracked tiles, uneven grout lines, or gaps in wood and luxury vinyl plank flooring.
- Doors and Windows: Open and close every window and door. Ensure locks engage smoothly and weatherstripping is intact.
- Cabinetry and Trim: Inspect crown molding joints, baseboards, and cabinet door alignment.
3. Plumbing and Electrical
- Fixtures and Pressure: Run hot and cold water at every faucet. Check for leaks under sinks and ensure toilets flush and fill correctly.
- GFCI Protection: Test all ground-fault circuit interrupter (GFCI) outlets in wet areas (kitchen, bathrooms, garage, exterior).
- Breaker Panel: Verify that the electrical panel is safely accessible and every single breaker is legibly and accurately labeled.
4. HVAC Systems
- Airflow and Calibration: Turn on the heating and cooling systems. Verify even airflow across all rooms and check that the thermostat is calibrated.
- Filters and Condensate: Ensure the return filters are clean and easily accessible, and check that the exterior condensate drain line flows freely.
5. Appliances and Safety Devices
- Appliance Functionality: Run a short cycle on the dishwasher, test the range burners, and verify the refrigerator is cooling. Ensure the range has its safety anti-tip bracket installed.
- Life Safety: Verify that smoke and carbon monoxide detectors are hardwired, interconnected, and functioning on every level and inside bedrooms.
Common Defects Found During Final Inspection Home Building Stages
Even in high-end custom builds, minor defects can occur. The most common issues flagged during final inspections include:
- Cosmetic Blemishes: Drywall nicks from trade movement, paint overspray, or slightly misaligned cabinet doors.
- Hardware and Adjustments: Sticky door latches, loose window locks, or wobbly light fixtures.
- Plumbing Anomalies: Minor slow drips under sinks, slow-draining tubs, or loose toilet bases.
- HVAC Inbalances: Rooms that receive too much or too little airflow due to unadjusted dampers.
- Exterior Grading: Soil settling near the foundation after heavy summer rains, which can alter proper drainage.
Ignoring these items can be costly. For builders, a single failed municipal final inspection can cost $50 to $250 in re-inspection fees, cause 2 to 7 days of schedule delays, and incur carrying costs of $200 to $600 per day.
For buyers, failing to document these issues before closing means losing your strongest leverage. Once the home is closed and the trades have moved on to new projects, getting minor cosmetic touch-ups scheduled can take much longer.
Buyer Preparation, Documentation, and Post-Closing Adjustments
To get the most out of your final inspection, come prepared. Treat it like a professional quality-control audit.
Your walk-through toolkit should include:
- Blue Painter’s Tape: Use small pieces of tape to mark cosmetic defects directly on walls, trim, or cabinets. The tape provides a clear visual indicator for the trade professionals who will perform the touch-ups.
- Smartphone/Camera: Take close-up photos of every flagged issue, as well as a wider shot showing the location of the blue tape in the room.
- Notepad or Tablet: Keep a written, numbered log of every issue that corresponds with your photos.
- Written Repair Requests: Never rely on verbal promises. Ensure every agreed-upon correction is documented in writing and signed by both you and the builder’s representative.
Navigating the 2026 Construction Landscape
As we navigate June 2026, the home building industry faces unique operational dynamics. Approximately 58% of builders have identified demand uncertainty as a leading operational constraint this year. Additionally, expected material inflation of 2% to 4% in 2026, coupled with tariff sensitivities on imported goods, means that backorders and material substitutions (such as a delayed custom light fixture or specialized sliding glass door) are more common.
Because of these supply chain realities, you may occasionally need to handle minor items via post-closing adjustments. If a non-essential custom item is backordered, you can still close on your home by creating a structured punch list. This list should outline:
- The specific incomplete items.
- The agreed-upon remedy or material substitution.
- A realistic target completion date.
- An escrow holdback agreement, if necessary, to secure the funds until the work is complete.
After you move in, most reputable builders will schedule a 30-to-90-day post-closing check-in to address any minor settling issues, followed by a formal one-year warranty inspection. If you ever encounter an unresponsive builder after closing, escalate your concerns in writing, reference your signed final punch-list agreement, and contact your local Home Builders Association (HBA) if necessary.
At Frey & Son, The Frey Son Homes Commitment to Quality ensures that we remain by your side long after moving day, addressing warranty items promptly and professionally.
Frequently Asked Questions About Final Inspections
Can you close on a new construction home with unfinished items?
Yes, you can close with unfinished items, provided they are minor, cosmetic, and do not affect the home’s safety, structural integrity, or habitability. For example, a delayed luxury dining room chandelier or a scratched cabinet door should not delay your closing. However, these items must be documented in a written punch-list agreement, often supported by an escrow holdback, detailing when and how the builder will complete the work.
How long should post-closing corrections take?
Simple touch-ups, such as paint detailing, drywall patches, or hardware adjustments, are typically resolved within 5 to 10 business days after closing. However, if an item involves backordered custom materials or specialized trade scheduling, it can take several weeks. The key is establishing a transparent, realistic timeline with your builder before you sit down at the closing table.
What is the difference between a final inspection and a Certificate of Occupancy?
A municipal final inspection is conducted by local building officials to verify that the home meets minimum safety, structural, and health codes. Passing this inspection is what allows the municipality to issue the Certificate of Occupancy (CO), legally permitting you to inhabit the home. Your private final inspection, on the other hand, is a detailed review to ensure the home matches your contract, your design selections, and the high standards of finish quality you paid for.
Conclusion
Building your dream home in Southwest Florida is an exciting journey, and the final inspection is the satisfying bridge that connects construction to homeownership. By approaching this step with a calm, organized, and detail-oriented mindset, you protect your investment and ensure a seamless transition into your new space.
For over 50 years, Frey & Son Homes has crafted award-winning, storm-smart custom homes defined by coastal architectural elegance across Naples, Marco Island, Cape Coral, and beyond. We understand the local environment, the strict regional building codes, and the high standards our clients expect.
If you are ready to start planning your custom home journey, contact us today to learn more about our building process and find out how long it takes to build a house in Florida with a team committed to quality from the first shovel in the ground to the final handshake.